What this adjustment solves on the trail
- It creates a local anchor at the top of the boot instead of just tightening everything harder.
- It works best for mild to moderate heel lift, especially on descents.
- It can reduce heel blisters and toe bang when the boot fit is otherwise close.
- It is not a cure for a boot that is too long, too wide, or the wrong shape for your foot.
- It costs nothing and takes only a little practice once the hand motion is familiar.
Why heel-lock lacing works better than simply tightening harder
I think of this as a targeted fix. If I just crank the laces from bottom to top, I often end up with a numb instep and the same heel lift. The lock changes where the tension sits: it clamps the lace over the bend of the foot and helps the heel stay planted in the heel cup while the forefoot still moves normally.
| Problem | Best lacing move | What it does | Where it falls short |
|---|---|---|---|
| Heel lift on descents | Heel lock | Anchors the heel so the foot stops drifting forward | Won't rescue a boot that is clearly too long |
| Pressure on the top of the foot | Window lacing | Leaves a relief zone over the instep | Doesn't tighten the heel pocket much |
| Toe bang from forward slide | Heel lock plus a good fit | Keeps the foot seated when the trail drops away | Won't fix an oversized boot |
Some hikers call this the runner's loop. I do not care about the label nearly as much as the result: the heel stays where it belongs, and the boot stops feeling like it is dragging the foot downhill. Once that is clear, the actual tying process is straightforward.
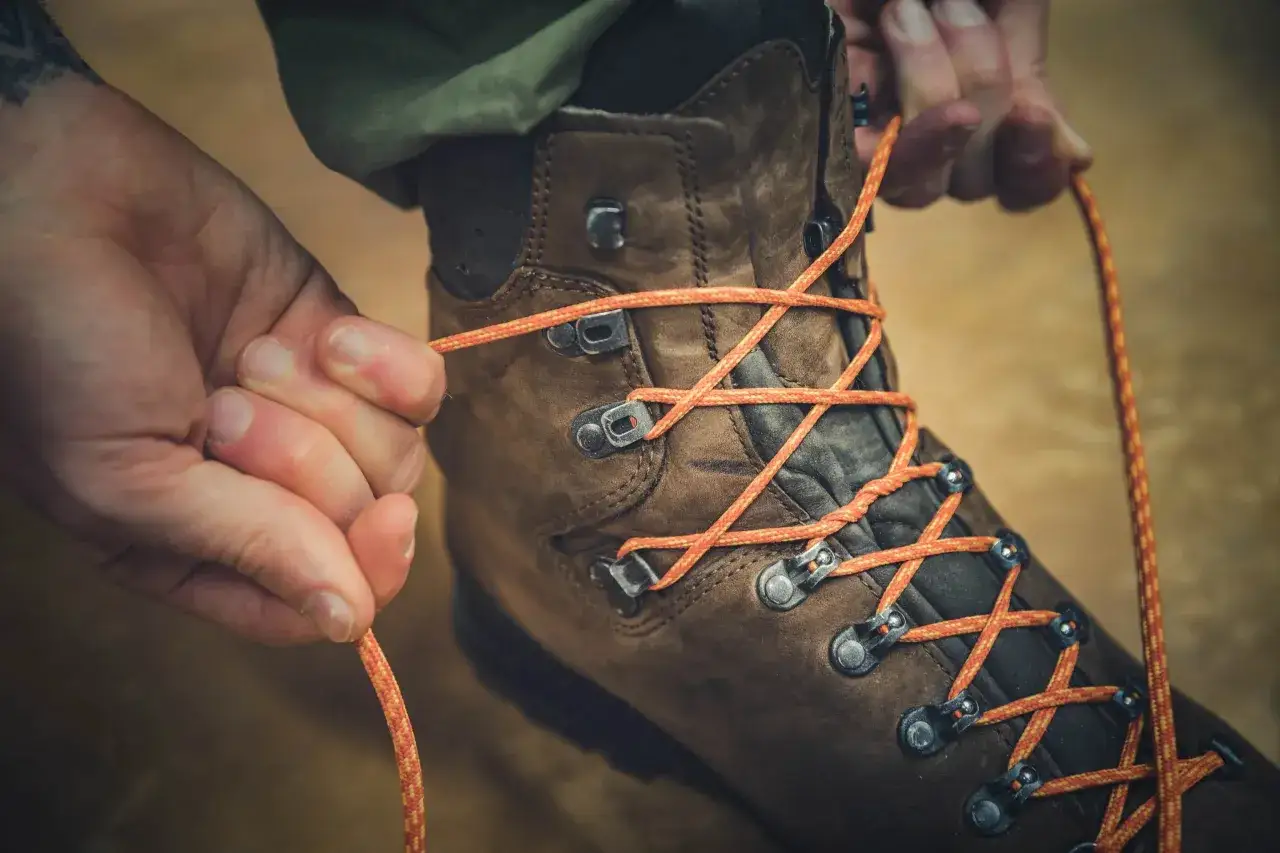
How I tie it on a hiking boot
I lace the boot normally until I reach the last two eyelets or hooks. Then I create a small loop on each side, cross the free ends through those loops, and pull the whole system upward to set the heel. The exact hardware can vary, but the goal does not: tension belongs over the instep, not wrapped around the ankle like a tourniquet.
- Lace the boot in the usual criss-cross pattern until the top two holes or hooks.
- Feed each lace through the top eyelet or hook on the same side so a small loop forms.
- Cross the lace ends and thread each one through the opposite loop.
- Pull straight up and slightly back until the heel feels seated, then finish with a bow or double knot.
On boots with speed hooks
Speed hooks make the lock easy to adjust because the lace can sit in the open hook without a fight. I like them for quick trail-side reties, especially when my feet have warmed up and need a little more hold.
Read Also: Hiking Shoe Tread - Match Your Sole to Any Trail
On boots with only eyelets
The same method still works, but I slow down and make the loops equal. With eyelets, uneven loop size is the main reason the lock feels lopsided or loosens too fast.
If I want extra security on a long day, I add a surgeon's knot just below the final tie so the tension does not migrate. The point is not maximum tightness; it is a stable, repeatable hold.When it helps and when the boot itself is the real issue
I reach for this technique when the heel slips a little, the boot is otherwise close, and the problem gets worse only on climbs or descents. That is usually a lacing or volume issue, not a complete sizing failure. If I still need to overtighten the boot to get a planted heel, I assume the shape or volume is wrong for my foot.
- Good candidate: heel lift appears mainly on steep ground.
- Good candidate: the boot felt close when new, but movement became noticeable after break-in.
- Good candidate: one foot needs a slightly different tension than the other.
- Not enough: you must crush the top of the foot to stop the heel from moving.
- Not enough: the heel still walks out even after adjusting socks and laces.
- Not enough: the toes jam because the boot is too long or the toe box shape is off.
That distinction matters on the trail. A lacing fix should fine-tune a near-fit, not disguise a boot that is structurally wrong for the foot. Once you know that line, the mistakes become easier to spot.
Mistakes that make the heel slip worse
This is where people accidentally sabotage the fix. The most common mistake is pulling the entire boot tight without creating a real lock; the second is placing the lock too high so it bites the ankle instead of holding the instep. I also see hikers use tired laces that slip back out after a short walk, then blame the technique when the real issue is friction and lace length.
- Locking around the ankle collar instead of over the bend of the foot.
- Making the loops uneven, which creates a crooked pull and weak hold.
- Overtightening the upper cuff and irritating the Achilles tendon.
- Using worn or overly slick laces that do not hold tension well.
- Ignoring the two-foot difference, because many boots need slightly different tension left and right.
- Forgetting to retie after the first few minutes when the boot settles and the foot warms up.
If the lock feels worse than a normal criss-cross tie, I usually back off, reset it, and start again rather than forcing the lace harder. The rest of the fit then comes down to the materials around the foot.
Laces, socks, and boot details that make the lock hold
The lace pattern is only half the system. Fresh laces, the right sock thickness, and a boot with enough upper hardware make the lock feel clean instead of fussy. I care about this section because a good fit usually comes from three small things working together, not from one aggressive pull on the lace ends.
- Laces: Keep them the same length and similar shape as the original pair, and replace them if they feel slick or stretched.
- Socks: Use moisture-managing hiking socks that fill the boot without bunching at the toes or heel.
- Boot hardware: Top eyelets or speed hooks give the lock a clean anchor point.
- Insole and volume: A stable underfoot feel matters because too much internal space makes every lace adjustment work harder.
I rarely try to solve heel slip with socks alone, but sock thickness absolutely changes the result. If the boot still feels loose after those adjustments, the better fix is probably a different size, last, or model rather than more tension.
What I check before a long descent
Before I commit to a long downhill, I want three things: the heel feels seated, the forefoot still has room to flex, and the collar does not dig into the Achilles. I test that with a short walk, a few steps on an incline, and a deliberate descent on stairs or a slope if I can find one.
- Lift each heel while standing and check for movement.
- Flex the ankle forward and make sure the instep feels supported, not pinched.
- Walk for a few minutes, then retie if the laces settle.
- Recheck after the boot and foot warm up, because tension changes once you start moving.
- Use the lock as a fine adjustment, not as a way to force a bad boot to behave.
Used well, this is a precise fit adjustment, not a magic trick. If the heel still lifts, the boot is telling you something about its volume, shape, or size, and I would rather listen to that signal early than spend a weekend fighting blisters. When the boot is close and the technique is clean, the difference is immediate: the heel sits deeper, the descent feels calmer, and the foot stops chasing the front of the boot.