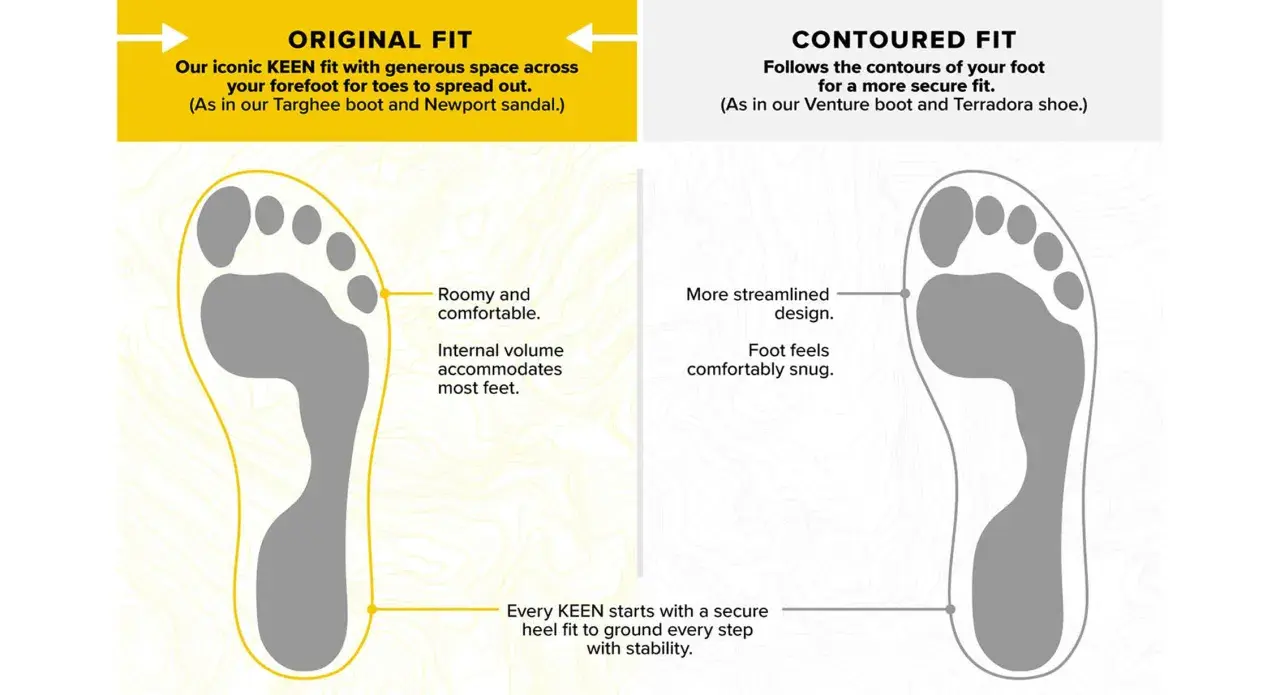
Hiking boots work best when the forefoot can move, the heel stays locked, and the toes never meet the front of the boot on a descent. The real answer to how much toe room in hiking boots you actually need is usually simpler than people think: enough space for the toes to relax, but not enough room for the foot to slide downhill. In this guide, I break down the fit rule I use, how to test it, and when a roomier toe box is the smarter choice.
Key takeaways for a better boot fit
- Leave about a thumb’s width of space in front of your longest toe when standing and laced.
- Check fit at the end of the day and with the socks you actually hike in.
- Toe room should prevent downhill toe bang without letting your foot slide.
- Wide toe box, wide width, and extra length are not the same thing.
- If the boot feels right in the heel and arch but wrong in the toes, size or shape is probably off.
How much space your toes actually need
In practice, I like a hiking boot to leave about a thumb’s width between the end of the longest toe and the front of the boot when you’re standing up straight. That is close to the fit advice I see echoed by outdoor retailers like REI and Backpacker: snug everywhere, but not tight, with room to wiggle your toes. The exact number is less important than the result. Your toes should stay relaxed and still avoid contact on a downhill step.
The boot should feel snug through the heel and midfoot, then open up enough in the front for your toes to wiggle, flatten, and spread slightly. That small amount of freedom matters because the foot changes shape under load. If you can only barely touch the front with your standing foot, the boot is too short. If you can slide forward several millimeters with each step, it is too roomy.
| Fit feel | What it means | Trail result |
|---|---|---|
| About a thumb’s width in front of the longest toe | Usually the right balance of length and control | Good for most day hikes and backpacking trips |
| Toes brush the front when standing | Too short, or the foot is sliding forward | Black toenails, bruising, and hotspots on descents |
| More than a finger or two of obvious extra length | Likely too long for precise hiking fit | Slipping, blisters, and less stable footing |
That balance is the real answer to toe room, and it matters even more when the trail starts dropping fast. From here, the next question is why the front of the boot has to work so hard in the first place.
Why toe room matters more on a hike than on a sidewalk
Feet do not stay static on a trail. They swell with heat, mileage, and pack weight, and they move forward every time you descend, brake on loose ground, or step down from a rock. On a long alpine trail, that can turn a boot that felt fine at the car park into one that suddenly feels cruel two hours later.
Too little room causes a simple chain reaction: the toes hit the front, the nail bed takes pressure, the skin rubs, and the forefoot starts guarding itself against every step. That is when blisters, bruised toenails, and forefoot pain show up. Too much room creates a different problem. The foot slides, the heel lifts, and the toes claw at the inside of the boot to keep balance. That can be just as fatiguing, especially on long descents where precision matters.
I also pay attention to terrain. Steeper trails, loose scree, and wet rock demand better control than a mellow path through the woods. The more technical the route, the more you want a secure heel and midfoot, because toe room alone does not keep you stable. The next step is learning how to test that balance before you buy.
How to check the fit before you commit
The best fit checks are simple, repeatable, and done under realistic conditions. I always test boots with the socks I plan to hike in, because a thin lifestyle sock and a cushioned hiking sock can change the fit more than people expect. I also try boots later in the day, when feet are naturally a little larger.
- Stand up in the unlaced boot and slide your foot forward until the toes just touch the front.
- Check whether you can fit a thumb behind the heel or see roughly a thumb’s width in front of the longest toe once you stand naturally.
- Lace the boot properly, then walk uphill and downhill if the store allows it, or at least walk on an incline board.
- Watch the heel: a little movement is normal, but obvious lift usually means the boot is too long or the volume is wrong.
- Stop and bend your knees. If your toes slam the front during a controlled downhill stance, the boot will punish you on real terrain.
A useful trick is to remove the insole and stand on it. If your foot hangs over the front, the boot is probably too short for serious hiking. If the insole looks dramatically shorter than your foot but the boot still feels sloppy, the problem is more likely width or volume, not length. That distinction saves a lot of bad purchases and returns.
When you should choose more room, and when you should not
Roomier toes make sense when your feet swell a lot, when you hike in hot weather, when you carry a pack for hours, or when you know your toes are sensitive on descents. They also make sense if your forefoot is naturally broad or if you prefer a more anatomical shape that lets the toes spread. That is one reason brands with wider toe boxes get so much praise from hikers who spend long days on trail.
But I would not confuse more toe room with more boot. Adding length to fix toe pressure can create heel slippage and instability. If the boot feels right everywhere except the front, you may need a wider model or a different last, not a bigger size. Brands build lasts differently, and that shape often matters more than the number on the box.
Here is the rule of thumb I use:
- If your toes hit the front on descents, go roomier.
- If your heel lifts and the foot slides, go more secure.
- If the boot is long enough but cramped at the forefoot, look for a wider toe box or a different last.
- If both length and shape feel wrong, the model is probably not for your foot.
That is why the “just size up” advice is often too crude. The better move is to match the boot shape to the foot, then fine-tune with lacing and socks. From there, the boot type itself starts to matter.
Why boot shape matters as much as size
Not all hiking footwear manages toe room in the same way. A low-cut hiking shoe, a mid boot, and a full backpacking boot can all be the right answer for different trails, but they do not behave the same once the terrain gets steep.
| Footwear type | Typical toe-room feel | Best for | Main tradeoff |
|---|---|---|---|
| Hiking shoes | Often lighter and less restrictive | Day hikes, faster movement, warm weather | Less ankle support and fewer options for heavy loads |
| Mid boots | Balanced between structure and movement | Most general hiking use | Fit varies a lot by brand and last |
| Backpacking boots | Usually more structured and protective | Rough terrain, heavier packs, longer trips | Can feel stiff if the toe box is narrow |
I pay special attention to the toe box when a boot is built on a narrow last. A narrow design can feel precise at first, but it may pinch after swelling or long descents. On the other hand, a very wide front can feel sloppy if the heel and midfoot are not equally well matched. The goal is not maximum space everywhere; it is the right geometry in the right places.
Small adjustments that fix a nearly-right boot
Sometimes the boot is close enough that a few adjustments solve the problem. I would try those before giving up on a model that is otherwise working.
- Change the sock system. A slightly thicker hiking sock can fill extra volume, while a thinner one can create more toe space without changing the shell.
- Adjust lacing. Use a heel-lock or runner’s loop if the foot slides forward; it can preserve toe room without sacrificing security.
- Try a different width. Wide and regular widths are not the same as extra length, and width is often the cleaner fix for forefoot pressure.
- Swap the insole. A lower-volume insole can create a little more internal depth or improve hold, depending on the boot.
- Do not ignore persistent toe contact. If the boot still bangs your toes on descent after adjustments, the size or shape is wrong.
That last point matters. A boot that only feels “almost” right in the store tends to feel worse after 8 miles, a hot afternoon, and a few steep drops. The final section pulls the fit check into a short decision list you can use before any long hike.
The fit checklist I use before a long hike
Before I trust a pair of hiking boots on a real route, I want five things: enough toe room, a locked heel, no pressure on the sides of the forefoot, a natural bend at the ball of the foot, and no forward slide when I walk downhill. If one of those fails, I treat it as a fit problem, not a break-in problem.
For me, the cleanest test is still simple: stand, walk, descend, and notice what the toes are doing. If they stay clear of the front and can still relax, the boot is close to right. If they are working all day just to stay out of trouble, the boot is asking too much. On a European mountain path, an Appalachian ridge, or a damp coastal trail, that difference shows up fast.
My practical bottom line: aim for about a thumb’s width in front of the longest toe, make sure the heel stays secure, and choose the boot shape that matches your foot instead of forcing a bigger size to do the wrong job. When those three pieces line up, hiking feels more controlled, and your toes stop being the first thing you think about on every descent.