A good hiking boot is not one object so much as a stack of decisions: the upper, the sole, the protective overlays, and the fit system all work together. When I break down the parts of a hiking boot, I can usually tell whether a pair will feel stable on wet stone, forgiving on long descents, or miserable after the first hour.
This guide walks through the main components, what each one actually does on trail, and how I judge whether a boot is worth trusting for day hikes, backpacking, or travel routes with mixed terrain. If you understand the anatomy, it becomes much easier to choose the right model and ignore the marketing noise.
What matters most in a hiking boot
- The upper controls fit, breathability, and how much abrasion the boot can take.
- The sole stack, including the insole, midsole, shank, and outsole, decides cushioning, stiffness, and grip.
- Heel lock and toe room matter more than showroom softness.
- Deeper lugs help most on mud, loose soil, and wet descents, while flatter soles feel better on hard-packed trails.
- Protective details like a toe cap, rand, and gusseted tongue matter more when the route is rocky, wet, or brushy.
- Light hikers may feel ready immediately, while sturdier leather boots often need a real break-in period.
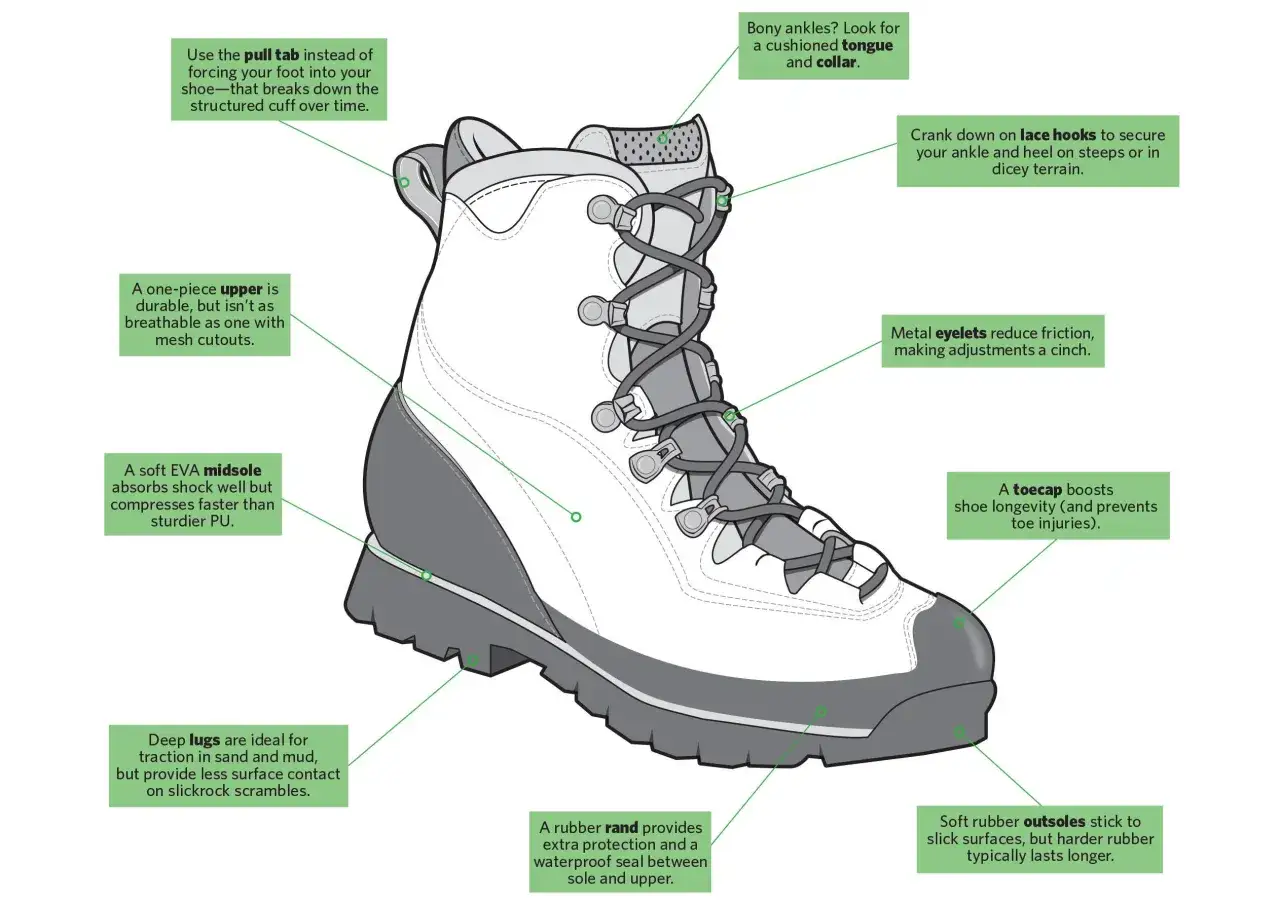
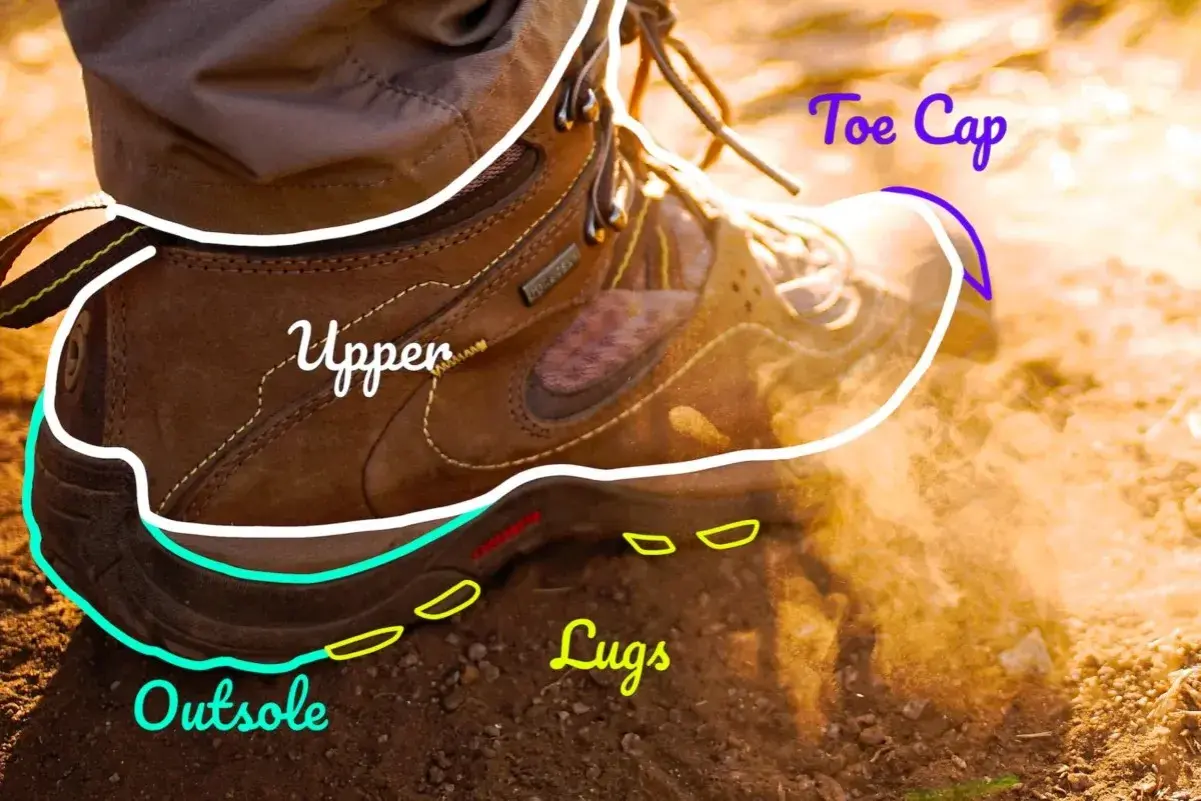
The core anatomy of a hiking boot
I usually start by separating a boot into two systems: the upper, which wraps and secures the foot, and the sole unit, which manages contact with the ground. That simple split makes the rest of the anatomy easier to read, because every part has a job and every compromise shows up somewhere on trail.
| Component | What it does | What I look for |
|---|---|---|
| Upper | Holds the foot in place and protects it from abrasion and weather | Even support, no sloppy movement, enough structure for the terrain |
| Toe box | Gives your toes room to spread and move forward on descents | Space without sliding, especially when walking downhill |
| Heel counter | Cradles the heel and helps prevent lift | Minimal heel movement, fewer blister hotspots |
| Collar | Wraps the ankle area and adds support or coverage | Enough height for the load and terrain, not extra bulk you do not need |
| Tongue | Protects the top of the foot under the laces | A centered, padded tongue that does not dig into the instep |
| Laces, eyelets, and hooks | Let you tune fit across the forefoot and ankle | Easy tension control and secure locking at the top |
| Insole | Sits under the foot and adds initial cushioning and fit tuning | Removable if I want to swap in an orthotic or different footbed |
| Midsole | Handles cushioning and most of the support underfoot | The right balance between softness and trail feedback |
| Shank | Adds stiffness and protects against sharp objects underfoot | Enough rigidity for rough terrain without making the boot feel like a plank |
| Outsole and lugs | Provide traction, braking control, and grip | Rubber quality, lug depth, and spacing that match the ground I expect |
| Rand and toe cap | Shield the lower boot from rock, brush, and toe strikes | Useful reinforcement without turning the boot into dead weight |
| Membrane and lining | Help with waterproofing, breathability, and comfort against the foot | Weather protection that still makes sense for the climate and season |
Once you can read those parts, it becomes much easier to spot whether a boot is built for real hiking or just looks the part. Next, I focus on the upper, because fit problems are usually the fastest way to ruin an otherwise decent boot.
How the upper shapes fit and protection
The upper is where comfort either comes together or falls apart. It is built around a last, which is the foot-shaped mold the boot is formed on, and that shape determines toe volume, heel hold, and how much room you get across the forefoot. A narrow last can feel precise on technical ground, but it can also punish wide feet and bunions; a roomier last feels more forgiving on long descents and all-day walking.
| Collar height | What it changes | Best use case | Main trade-off |
|---|---|---|---|
| Low-cut | Sits below the ankle and keeps the boot lighter | Fast day hikes, warm weather, lighter loads | Less ankle coverage and less support on rough ground |
| Mid-cut | Rises around the ankle and gives a more secure feel | Mixed terrain, backpacking, general hiking | Heavier and slightly warmer than low-cut designs |
| High-cut | Wraps higher for more support and protection | Rocky routes, winter use, heavier packs | Bulkier, slower drying, and less casual to walk in |
For the rest of the upper, I pay most attention to the heel counter, the toe box, the tongue, and the lacing hardware. The heel counter should keep the heel from sliding up and down, because that piston motion is a blister factory. The toe box should let your toes spread naturally, with a bit of room for downhill travel, but not so much room that your foot glides forward every step.
The tongue matters more than many people expect. A gusseted tongue, which is attached along the sides, does a better job of blocking grit, debris, and splash water than a loose tongue that leaves a gap. I also like a lacing system that lets me lock the forefoot separately from the ankle, because that is how I fine-tune pressure on long climbs and descents. Once the upper is doing its job, the sole stack becomes the next place where a boot earns or loses my trust.
Why the sole stack changes the way the boot feels
The sole is not one piece. It is a layered system, and each layer changes how the boot rides over the trail. The insole gives the first bit of cushioning, the midsole handles most of the shock absorption, the shank adds stiffness and puncture resistance, and the outsole is the part that actually grips the ground.
| Material or part | What it feels like | Why it matters |
|---|---|---|
| EVA midsole | Lighter, softer, more forgiving | Good for comfort and easier walking, but it compresses faster |
| PU midsole | Densier, firmer, usually more durable | Better when I want long-term support and less collapse over time |
| Shank | Adds rigidity under the foot | Useful on rocky routes, steep ground, and with heavier packs |
| Outsole rubber | Controls grip and braking | Harder rubber usually lasts longer; softer rubber often grips rock better |
| Lugs | The raised tread blocks under the boot | Usually around 3-5 mm deep; deeper lugs bite better in mud, while spaced lugs shed slop more easily |
In practice, I think about the sole like suspension and tires on a vehicle. A soft, cushioned midsole can feel great on easy paths, but if it is too soft for the route, the boot feels vague on sidehills and unstable on broken stone. A firmer boot may feel less plush in the store, yet it can be the better tool when the trail is rocky, the descent is long, or the pack is heavy.
Lug shape matters too. Closely packed lugs can clog with heavy mud, while aggressive, wide-spaced lugs usually grab better on soft ground but can feel awkward on paved approaches or hard-packed trails. That is why I never judge a sole by one number alone. I want the entire stack to match the terrain I am actually going to walk, not the terrain on the marketing photo. The smaller protective details are what make that stack last.
The small details that keep dirt, water, and impact out
The little features are easy to ignore until something goes wrong. A rand is the rubber reinforcement around the lower boot, and it acts like a bumper against stones, roots, and scuffs. A toecap does the same job at the front, where toe strikes are most likely. On rocky routes, scree slopes, or narrow mountain paths, those details save the softer upper from getting shredded too early.
I also look closely at the stitching and overlays. Modern hiking boots often combine stitched panels with bonded pieces and synthetic reinforcements, so one weak area does not have to doom the whole boot. The trade-off is simple: more protection usually means more weight and a bit less flexibility. That is worth it on rough ground, but I do not want unnecessary armor on an easy forest loop.
Waterproof membranes and linings deserve a practical, not romantic, view. They help in cold, wet, or shoulder-season conditions, especially when I know the route will stay damp for hours. But they also slow drying and can run hotter in summer. If I expect warm weather, fast pace, or frequent stream crossings, I sometimes prefer a more breathable upper that dries quickly instead of one that promises all-day waterproofing and traps heat. After the boot is built, the final test is whether it actually fits a human foot properly.
How I would test a boot before buying it
I trust a boot less the more it depends on hope. The right pair should feel broadly correct the moment I put it on, and that is still true whether I am shopping for an easygoing day hiker or a sturdier backpacking boot. American Hiking Society’s advice lines up with my own approach here: comfort and heel hold matter more than showroom softness.
- Wear the hiking socks I actually plan to use. Fit changes fast when you swap from thin socks to padded ones.
- Lace the boot all the way up, then tighten it in stages. I want firm forefoot hold without numbness on top of the foot.
- Walk on an incline if the store allows it. Going uphill tells me about forefoot flex; going downhill tells me whether my toes will slam forward.
- Check for heel lift. A tiny bit of movement can be normal, but repeated up-and-down motion is a blister risk.
- Feel where the boot bends. It should flex near the ball of the foot, not collapse awkwardly through the arch.
- Pay attention to pressure points around the tongue, collar, and eyelets. I would rather catch those now than after ten miles of switchbacks.
Break-in time is another area where realism helps. REI’s current guidance is still sensible: lighter hikers may feel good almost immediately, while burly leather models can need weeks of wear to soften and settle. I would not force a painful boot into service and hope the problem disappears on trail. If it hurts before the hike starts, it is usually the wrong shape, not just a boot that needs more optimism. Once I know the fit is right, I start thinking about what will wear out first.
When boot parts wear out and what that means
Most hikers notice the obvious failures late, but the important signs usually show up earlier. The outsole may still look fine while the midsole has already gone dead, and that dead feeling is what often makes a boot feel unstable, even if the upper is still intact.
| What you notice | Likely worn part | What I would do |
|---|---|---|
| Lugs look rounded and grip drops on wet rock | Outsole | Watch traction closely and plan for replacement |
| The boot feels flat or tired underfoot | Midsole | Retire it even if the upper still looks clean |
| Heel slip gets worse over time | Heel counter or lacing support | Try a different insole or lacing pattern; replace if structure has collapsed |
| Water starts entering through seams or worn fabric | Upper, stitching, or membrane | Reproof if it is just the finish; replace if the structure is failing |
| Laces fray or eyelets feel rough | Hardware | Replace laces first, then inspect the hardware for sharp edges |
| Toe area starts to split or separate | Toe cap, rand, or upper bond | Do not gamble on a long trip; structural failure usually gets worse fast |
In my experience, laces and insoles are the easiest fixes, while outsole wear and midsole collapse are the real retirement signals. A boot can still look respectable from the outside and be poor on trail because the support has disappeared underneath your foot. That is why I check feel first and appearance second. The terrain you hike should decide which of these signals matters most.
Let the trail decide which parts matter most
If I were choosing for rocky alpine passes, I would prioritize a firmer midsole, a more confident heel counter, a protective rand, and a toe cap that can take a hit. If the route was wet, muddy, or coastal, I would pay more attention to the outsole pattern, the tongue construction, and how fast the boot dries after a stream crossing. For long days with a pack, I want secure lacing and enough collar structure to keep my foot from wandering around inside the boot.
- Rocky terrain calls for stiffness, protection, and good toe security.
- Muddy or soft trails reward deeper lugs and tread spacing that clears debris.
- Warm-weather hiking usually benefits from lighter materials and better airflow.
- Wet, cold, or shoulder-season routes make waterproofing and membrane quality more useful.
- Travel days that turn into hikes are easier with a boot that balances comfort and support instead of chasing one extreme.
The simplest way I can put it is this: read the boot from the ground up. Start with traction, then cushioning, then fit, then the protective details that match your route. If those layers make sense together, the boot usually works better than a pair that looks impressive but feels wrong the moment the trail turns steep or slippery.