Comfort on the trail often comes down to a few millimeters of pressure over the instep or a little too much movement at the heel. I use parallel lacing when a hiking boot fits well in length but feels cramped across the top of the foot, because the straight bars spread tension more evenly and take some of the bite out of the laces. In the sections below, I break down how the pattern works, how to lace it cleanly, when it beats criss-cross lacing, and when another fix is smarter.
More instep room comes at the cost of less heel lockdown
- It is best for pressure relief on the top of the foot, especially with a wide forefoot or high instep.
- It works best when the boot already fits in length and you want a finer comfort adjustment.
- It is not the strongest choice for heel hold, so a heel lock or surgeon's knot may still be needed.
- Most hiking boots and shoes can use this pattern if the laces are long enough and not overly stiff.
- If your toes are jammed or the boot is simply too short, lacing will not solve the root problem.
Why this pattern changes the feel of a hiking boot
Traditional criss-cross lacing pulls the upper together on diagonals, which is efficient but can concentrate pressure right where many hikers feel it most: across the instep, the top of the midfoot. I think of the straight-bar pattern as a way to spread force sideways instead of squeezing inward from both directions. That matters on long climbs, warm days, and any hike where your feet swell a little after the first hour.
The fit change is subtle when you look at the boot, but the feeling on foot is not subtle at all. For hikers with a wide forefoot, a high instep, or a foot that gets irritated by firm laces, the pattern can turn a barely tolerable boot into one that is usable for full-day walking. It is a comfort tool, though, not a miracle cure. If the boot is already the wrong shape for your foot, the lacing can only do so much. That is why I like to treat it as a fit adjustment, not a replacement for proper boot selection.
Once you understand what it changes, the next step is making the pattern neat enough to stay comfortable instead of turning it into a fussy experiment.
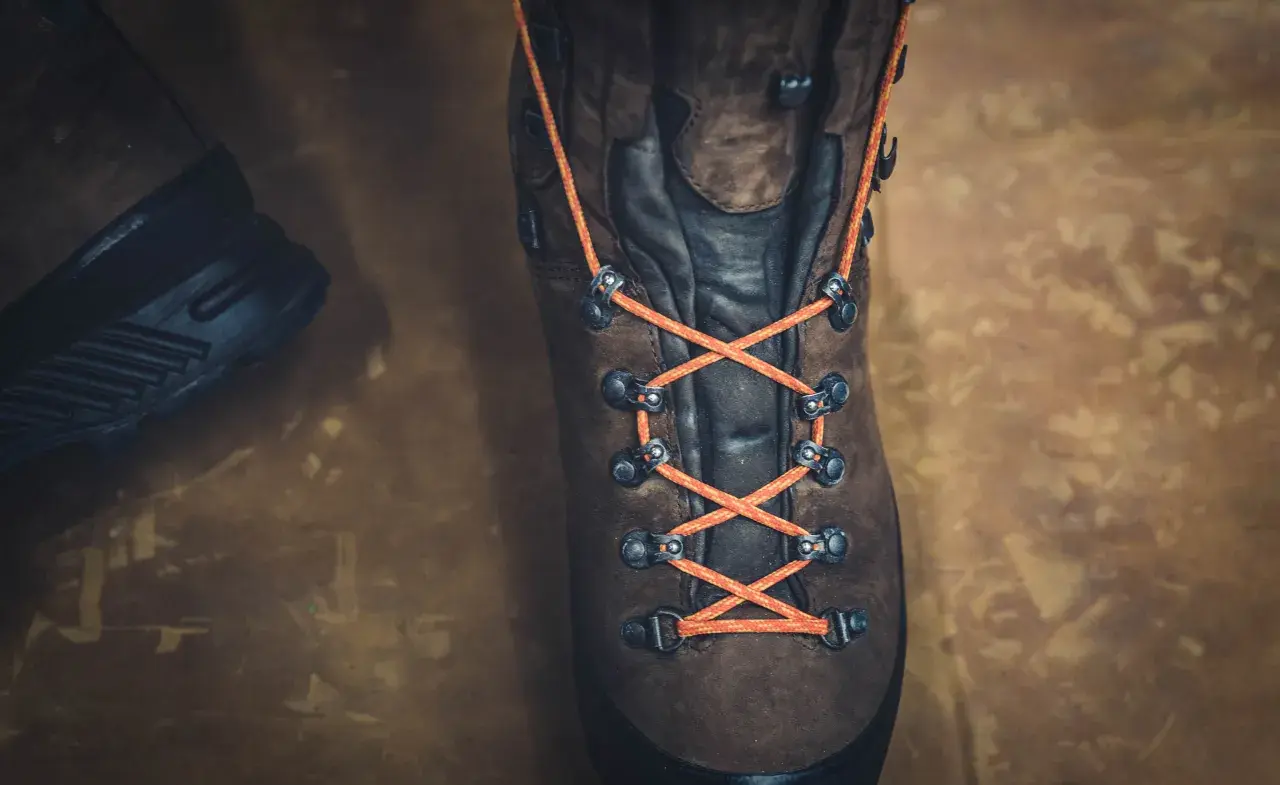
How I lace hiking boots with a straight-bar pattern
- Start with the boot fully unlaced so you can see the eyelets clearly and check that the laces are long enough for the finish you want.
- Thread the lace through the bottom pair of eyelets from the outside in so the first bar sits flat across the tongue.
- Bring each lace end up the same side, keeping it flat against the inside of the boot rather than crossing over the top of the foot.
- Feed each end across to the matching eyelet on the opposite side, then repeat the pattern upward row by row.
- Keep the bars even and avoid twisting the lace, because a twist creates a pressure ridge that defeats the whole point.
- Near the top, decide whether you want a normal bow, a surgeon's knot, or a heel-lock finish, depending on how much rearfoot security you need.
I am not chasing perfect symmetry for its own sake. What matters is a flat, consistent path over the tongue and a tension level that feels secure without compressing the top of the foot. If your boot has an odd number of eyelet pairs, the finish may look slightly different at the top; that is fine as long as the pressure distribution feels right.
That setup matters most when you compare it with the other lacing styles hikers reach for first.
When I choose it over other hiking boot lacing styles
Not every pressure problem needs the same fix. I choose the lacing pattern below when I want to match the shoe to the foot shape, the terrain, and the symptom instead of just tightening everything and hoping for the best.
| Method | Best for | Main benefit | Main tradeoff |
|---|---|---|---|
| Straight-bar lacing | Wide forefoot, high instep, top-of-foot pressure | More even pressure across the instep | Less heel hold than a locking finish |
| Criss-cross lacing | General use and quick adjustments | Simple, familiar, and stable for most boots | Can pinch the top of the foot |
| Window lacing | A hot spot on one specific area of the instep | Creates a gap where pressure is worst | Can reduce support in that zone |
| Heel-lock lacing | Heel slip on descents | Improves rearfoot hold and helps reduce blisters | Does not solve forefoot compression |
In practice, I often combine methods. A boot with a roomy forefoot but a sloppy heel may get straight-bar lacing through the lower section and a heel lock near the top. That combination is useful on steep descents, where a little forward slide can turn into sore toes fast. The key is to solve the actual problem instead of assuming one pattern must do everything.
Even a good pattern fails if the laces are too thin, the tension is uneven, or the boot fit is already wrong.
The mistakes that erase the comfort gain
The most common mistake is simply over-tightening. Hikers often crank the laces down because tight feels supportive, but too much tension can numb the foot, make the tongue dig in, and create new hot spots. The goal is secure contact, not a vice grip.
- Using the lacing pattern to hide a bad fit. If the boot is too short or too narrow in the toe box, relacing will not change the shape of the shell.
- Ignoring sock thickness. A thin summer sock and a thick merino sock can change the fit enough that the same lacing tension feels completely different.
- Choosing the wrong lace type. Very slick laces slide loose, while overly bulky laces can make it harder to keep the bars flat and tidy.
- Forgetting heel hold. A boot that feels good over the instep can still let the heel lift, especially on climbs and descents.
- Leaving the tongue off-center. If the tongue folds, the pressure lands unevenly and the pattern loses its comfort advantage.
I also pay attention to foot swelling. On a longer hike, the same boot can feel fine at mile one and cramped by midday, so I prefer to make final adjustments after the foot has warmed up a bit. That is especially true on hot summer routes and on long mountain days where the terrain keeps changing.
The real test is not the mirror check; it is how the boot behaves after an hour, a climb, and a descent.
How I test it on a real hike
When I am dialing in a pair of hiking boots, I test the lacing in three short stages. First I walk on flat ground for 10 to 15 minutes to see whether the top of the foot feels evenly supported. Then I look for heel lift on a short climb, because that is where a boot that seemed fine in the parking lot often starts to tell the truth. Finally, I test a descent, since toe bang and forward slide show up quickly when the grade turns down.
- If the forefoot feels open but the heel slips, I tighten the upper section or add a locking finish.
- If the top of the foot feels numb or hot, I back off tension across the instep first.
- If the toes hit the front on descents, I check length before blaming the lacing.
- If the comfort changes after 20 to 30 minutes, I re-tie before the problem turns into a blister.
That test matters because trail comfort is dynamic. Heat, swelling, terrain, and pack weight all change the way a boot sits on the foot, so I want a lacing method that can adapt instead of forcing one static fit for the entire day.
When the lacing is doing its job, the boot feels quieter on foot, and that is the sign I trust most.
The small adjustments I make before heading out
If I am packing for a longer hike, I treat the lacing pattern as one part of a larger comfort system. The other pieces matter just as much: the right sock thickness, a boot that matches the volume of the foot, and laces that are long enough to finish cleanly. In many cases, the biggest difference comes from a small combination of changes rather than one dramatic trick.
- For a wide forefoot, I keep the lower part of the boot flatter and less compressive.
- For a high instep, I avoid stacking too much tension directly over the top of the foot.
- For steep descents, I add a locking finish to reduce heel movement.
- For day hikes that turn into all-day walks, I re-check the fit after the first rest break.
If I had to reduce the whole topic to one rule, it would be this: use the lacing pattern to spread pressure, not to force the wrong boot into working. When the boot already matches your foot, a cleaner lace path can make a bigger difference than people expect, and that is often enough to turn a long mountain day into an easier one.