Boot-related foot blisters usually come down to movement, moisture, pressure, or a shape mismatch between the boot and the foot. Blisters from boots are usually a fit-and-friction problem, not a toughness problem. In this article, I break down why they happen, how I choose hiking footwear that behaves better on long days, what to do the moment a hot spot starts, and when the boot itself is the thing that needs replacing.
What matters most before the next hike
- Heel lift, toe bang, and wet skin are the fastest routes to boot blisters.
- Snug heel hold and toe-box room matter more than brand names or break-in myths.
- Moisture-wicking socks and targeted lacing fixes usually solve more problems than thicker socks alone.
- At the first hot spot, stop, dry the skin, and protect it before it becomes a full blister.
- Most small friction blisters heal in about 3 to 7 days if you stop re-irritating them.
Why boots cause blisters in the first place
I treat blister prevention like a small systems problem. Skin, sock, boot, and trail conditions all interact, and one weak link can turn a long descent or a wet traverse into a painful day. In practice, the damage starts when repeated rubbing separates the upper layers of skin; fluid collects underneath, and what began as a hot spot becomes a blister.
The pattern is usually easy to read once I stop guessing and look at the cause.
| Common trigger | What it feels like | What usually helps |
|---|---|---|
| Heel lift | Rubbing at the back of the heel or Achilles | Heel-lock lacing, better heel hold, less excess volume |
| Toe bang | Toes hit the front of the boot on descents | More toe-box room and a fit that stops foot slide |
| Wet skin | Soggy feet and a hot spot that appears quickly | Moisture-wicking socks, drying breaks, and cleaner trail conditions |
| Pressure seams | One exact line or edge hurts every step | Different sock construction, padding, or a different boot shape |
| Debris | A gritty, “something is in there” feeling | Stop early and clear the shoe before the grit becomes a rub point |
If I diagnose the trigger correctly, the fix is usually straightforward. If I guess wrong, I end up adding padding to a boot that was too wide or tightening laces on a boot that was already too narrow. That is why the next step is fit, not just cushioning.
How to choose hiking footwear that does not rub
When I fit hiking footwear, I want it snug through the heel and midfoot, with enough room in the forefoot for natural swelling and downhill movement. I usually test that by walking, climbing stairs, and then walking downhill if the store layout allows it. Standing still tells you almost nothing. In front of the longest toe, I like about a thumb’s width of space, but I do not want the foot sliding around inside that space.
- The heel should stay planted without obvious lift.
- The toes should have room to wiggle, but not so much room that the foot slides forward.
- The top of the foot should feel secure without sharp pressure across the instep.
- The widest part of the foot should not feel crushed by the boot’s shape.
I also try boots later in the day, when feet are slightly larger, and I wear the same socks I plan to hike in. That matters on a hot U.S. summer trail as much as it does on a long European route, where heat, descents, and swelling stack together over hours. Once the fit is close, lacing and sock choice become the difference between a tolerable day and a miserable one.
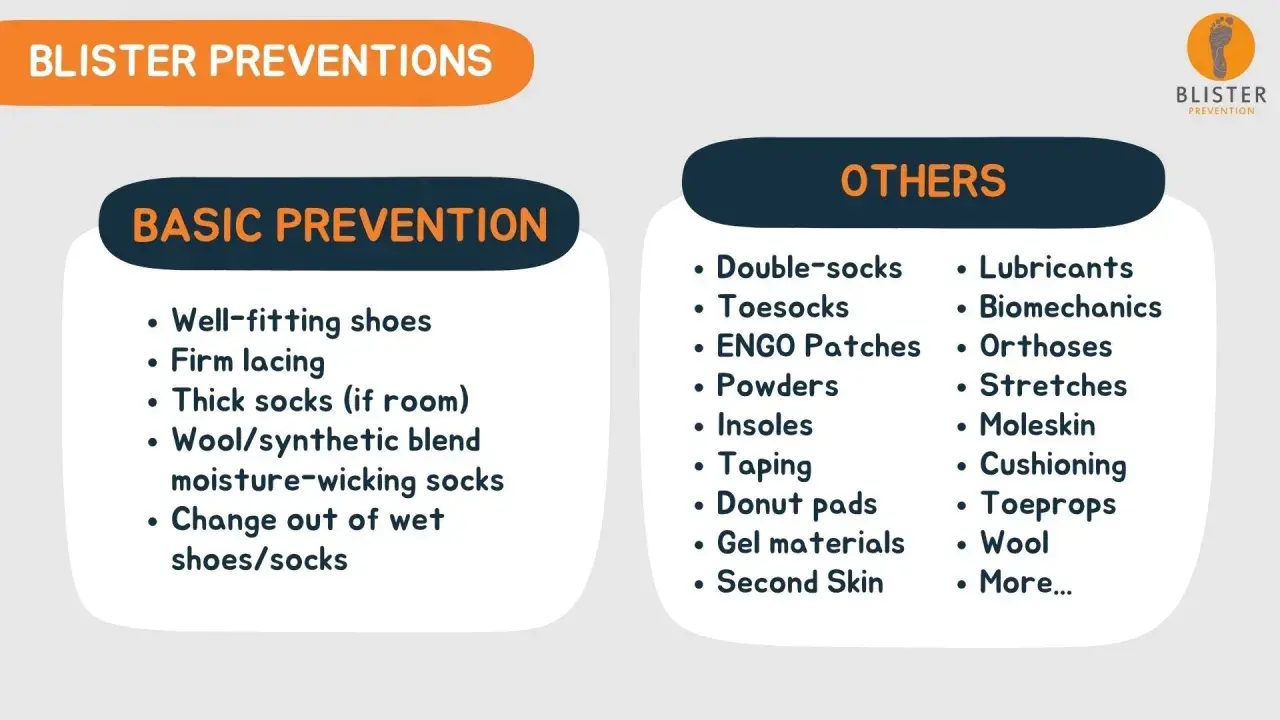
Socks, lacing, and moisture control do more than most people think
For me, socks are part of the footwear, not an accessory. Merino wool and synthetic hiking socks usually manage sweat better than cotton, and a smooth, snug sock tends to outperform a thick, sloppy one. If the sock wrinkles, it creates a pressure ridge; if it traps sweat, the skin softens and the rubbing gets faster.
I use lacing to solve a specific problem rather than just “tighten everything.” Heel-lock lacing, a loop that locks the heel back into the pocket, helps reduce rear-foot movement. Window lacing takes pressure off a sensitive instep. If the forefoot feels crowded on descents, I loosen only the area that needs space instead of making the whole boot loose.
- Heel slip usually calls for a heel-lock or runner’s loop.
- Instep pressure often responds to a skipped eyelet or window lacing.
- Moisture usually needs a sock change, a drying break, or both.
I treat anti-friction balm, tape, or a liner sock as a backup, not a first-line fix. If the shoe still rubs after those adjustments, I move immediately to trail-side protection. That saves more hikes than hoping the problem will “settle down” on its own.
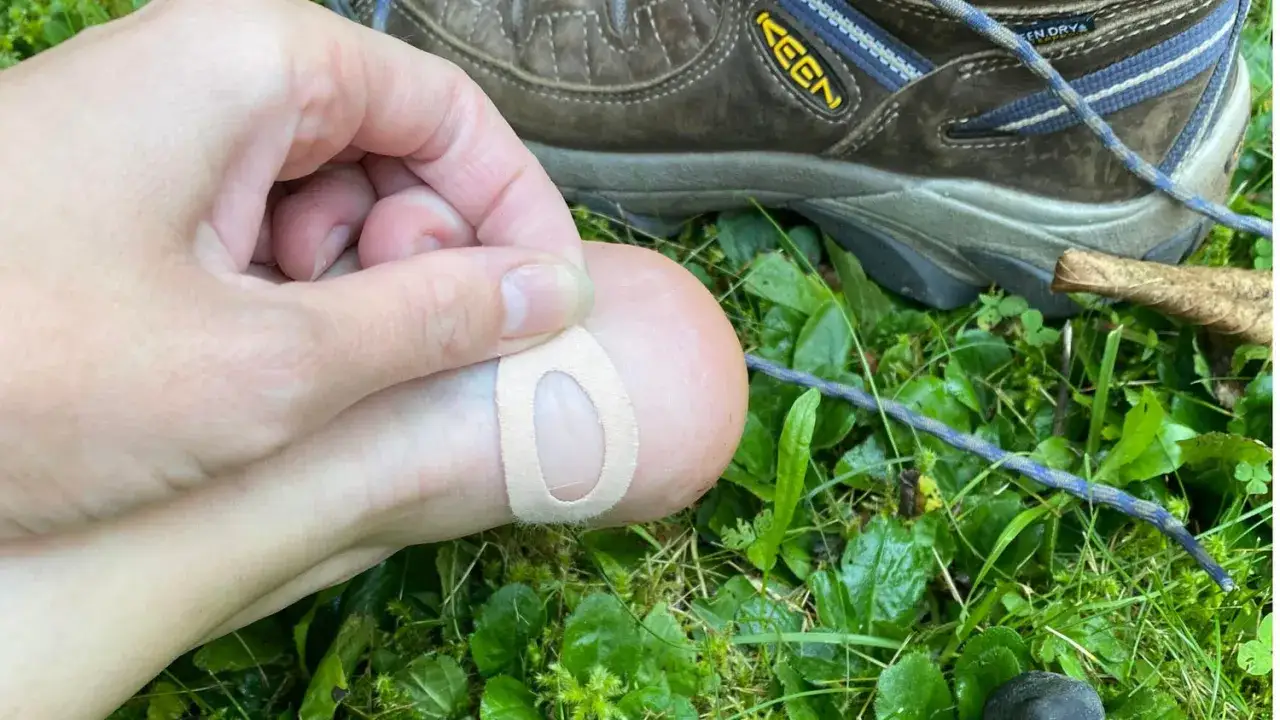
What to do at the first hot spot
The second I feel a hot spot, I stop or slow down. That tiny pause is usually cheaper than a blister that turns the last four miles into a limp.
- Take off the boot and sock.
- Dry the skin and clear any grit.
- Cover the spot with tape, moleskin, or a hydrocolloid dressing. A hydrocolloid dressing is a cushioned adhesive pad that reduces rubbing while the skin settles.
- Reposition the sock so there are no wrinkles.
- Check the lacing again before you start moving.
I usually leave an intact blister alone. The skin roof is useful because it protects the raw area underneath and lowers infection risk. If it opens on its own, I clean it gently, keep it covered, and watch for spreading redness, warmth, pus, or worsening pain. If you have diabetes, poor circulation, or a blister that already looks infected, I would not treat it as a simple trail nuisance.
When the boots are the wrong tool, not just the wrong size
When the same spot keeps failing, I stop blaming luck and start looking at the boot shape, the wear pattern, and the way the foot moves inside the shoe. A boot can be broken in and still be wrong for a narrow heel, a high instep, or a wide forefoot.| Blister location | What it often points to | First thing I change |
|---|---|---|
| Back of heel | Heel lift or a collar that rubs | Try heel-lock lacing, a better heel cup, or a different model |
| Outer toes or little toe | Toe box too narrow | Move to a wider last or more forefoot volume |
| Under the ball of the foot | Foot sliding forward or insole movement | Check sizing, socks, and insole placement |
| Top of the foot | Instep pressure from laces | Use window lacing or skip an eyelet |
| Both feet after rain or sweat | Moisture and soft skin | Change socks, dry more often, and reduce friction points |
Once the same boot keeps producing the same injury after I have already fixed the obvious things, I consider it worn out or mismatched. Midsole foam compresses, heel counters soften, and the upper can stretch in ways that help some feet while sabotaging others. At that point, another hour of tinkering is usually less efficient than choosing a different width or a different last. That is the moment when prevention stops being about patching and starts being about replacement.
A trail-tested routine that keeps your feet ahead of the problem
Before I head out, I use a short routine that catches most problems before the trail does.
- Trim toenails before longer hikes so the front of the boot does not become a pressure point.
- Wear the exact socks you plan to hike in when you test the boots.
- Take two or three short test walks before trusting new footwear on a bigger route.
- Pack tape, blister pads, and a dry spare pair of socks.
- Start with laces snug, then adjust after the first climb or descent.
- Stop at the first hot spot instead of hoping it will disappear.
The best blister prevention is usually boring: fit, dryness, and quick corrections. Once those three are handled, hiking boots stop feeling like a gamble and start behaving like the tool they are meant to be.