Hiking boots can fail long before the tread is gone, and the annoying part is that they sometimes do it while sitting in a closet between trips. The real cause is usually a mix of material aging, moisture, heat, and construction choices, especially in boots with polyurethane midsoles and bonded layers. Here I break down what is actually failing, how to spot it before a trail day turns into a repair bill, and how to store footwear so it survives more than one season.
The main things to know before a hiking boot sits too long
- PU midsoles are the most common reason older hiking boots crumble in storage.
- Hydrolysis is a water-driven chemical breakdown that can happen even when boots are not being worn.
- Heat, humidity, and direct sun speed up adhesive failure and rubber aging.
- A boot can look clean on the outside and still be near the end of its life inside.
- In the U.S., a basic resole often runs about $80-$150; more complex rebuilds cost more.
- Storage matters, but construction matters just as much: resoleable boots usually age better than cheap cemented pairs.

What is actually breaking down inside an unused boot
When I look at a pair that has fallen apart after years in storage, I usually do not see one single failure. I see a stack of small ones: the cushioning foam hardens, the bond between layers weakens, and the upper stops supporting the sole the way it should.
Polyurethane midsoles
In many hiking boots, the midsole is made from polyurethane, or PU. Hydrolysis is the slow chemical breakdown of PU by moisture in the air, and over time the material can become brittle, shrink, and crumble. The important part is that this can happen even if the boots are sitting untouched; wearing is not what causes the damage, it just reveals it faster once the material has aged.
Bonded seams and adhesives
Most trail boots are not built from one solid block. They rely on adhesive layers to hold the outsole, midsole, rand, and upper together. Heat can soften those bond lines, cold can make them less flexible, and humidity can slowly weaken them. When that happens, delamination starts, which simply means the layers begin to separate.
Read Also: Approach Shoes Fit - Your Guide to Precision & Comfort
Leather, rubber, and fabrics
Leather can dry out and crack if it is stored badly; rubber can harden; mesh and synthetic panels can age differently from the foam around them. None of these failures is glamorous, but they matter because hiking boots depend on all of them working together. Once one layer starts to give, the next section shows why hiking footwear is especially vulnerable in storage.
Why hiking footwear is especially vulnerable in storage
Trail boots are designed to be supportive, waterproof, and stable under load. That usually means more layers, more glue lines, and more material types than a simple casual shoe, which gives aging more places to start.
| Component | What storage does to it | What you may notice first |
|---|---|---|
| PU midsole | Moisture slowly breaks down the foam structure | Crumbling, hard spots, loss of cushioning |
| Adhesive bond lines | Heat and humidity weaken the glue over time | Outsole edge lifting or a visible gap near the rand |
| Leather upper | Dry air removes oils; damp storage encourages mildew | Stiffness, surface cracking, odor |
| Rubber outsole | Light, ozone, and heat age the compound | Harder feel, surface checking, reduced grip |
A waterproof lining does not change that basic chemistry. It helps keep water out while you hike, but it does not stop the materials in the sole unit from aging on the shelf. In the U.S., I would trust a closet or ventilated room far more than a garage, attic, or car trunk, because temperature swings are brutal on glue and foam. That leads to the more useful question: how do you tell normal wear from age-related failure?
How to tell aging from ordinary wear
Normal wear and storage damage do not look the same. Wear usually shows up where your foot flexes and strikes the ground; age-related failure often appears in places that have hardly been abused at all.
- Crumbling foam near the heel or arch usually points to hydrolysis, not mileage.
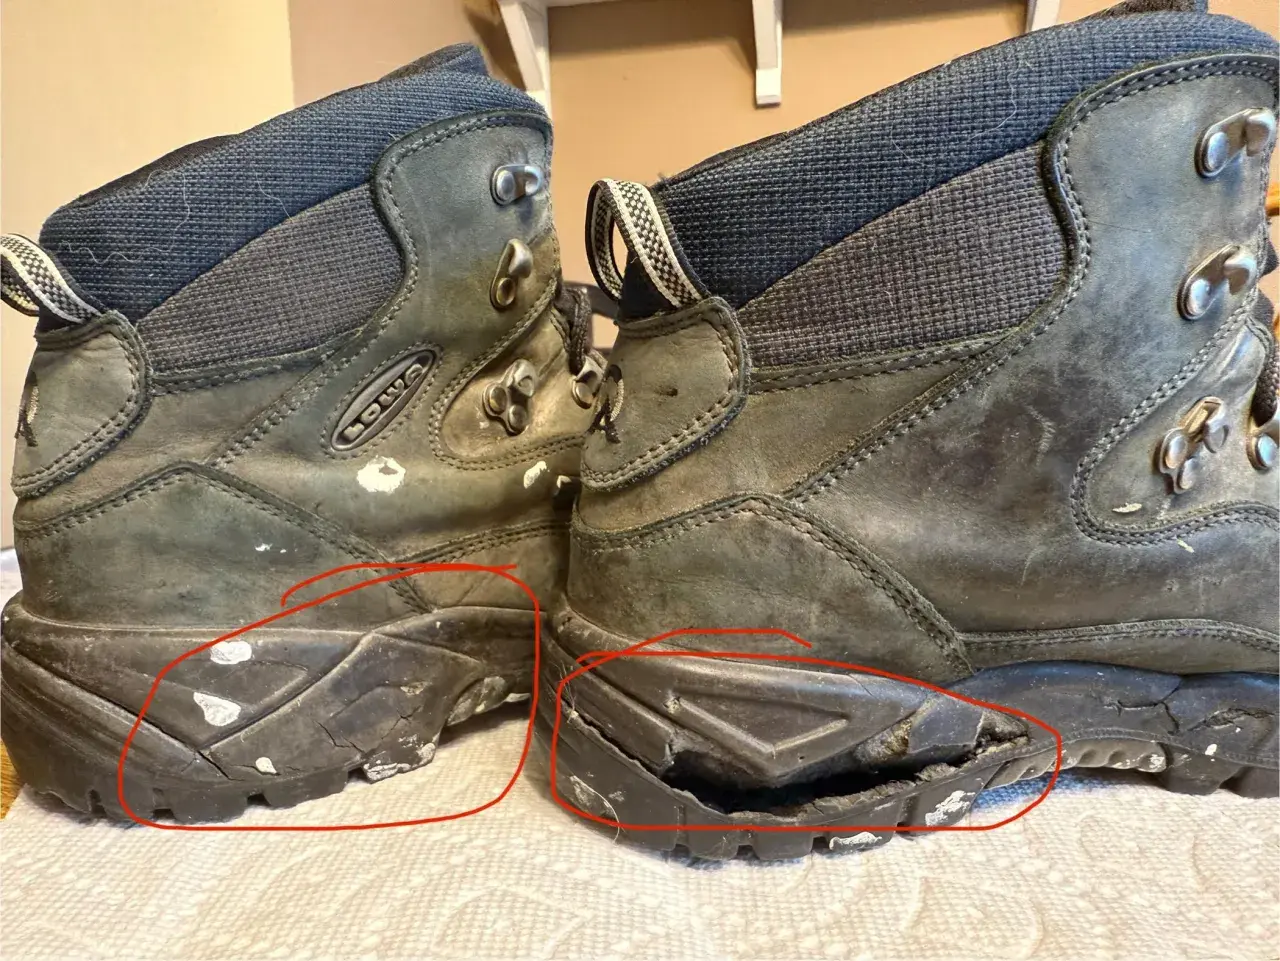
- A sole that peels away cleanly often suggests adhesive failure or delamination.
- White dust, sticky residue, or cracked midsole edges are classic warning signs in older PU boots.
- Hard, flattened cushioning means the foam has lost resilience; compression set is the term for foam that no longer springs back properly.
- One boot failing much faster than the other can happen if they were stored unevenly or exposed to more heat and moisture on one side.
If the tread is still decent but the midsole is turning brittle, the problem is not cosmetic. Once the foam loses integrity, the boot can fail suddenly on a descent or sidehill, which is exactly the sort of surprise hikers do not want. The next section is the part I care about most in practice: how to keep that from happening in the first place.
How to store hiking boots so they last longer
Good storage does not make a boot immortal, but it can slow the damage enough to matter. The goal is simple: keep the boots clean, dry, shaped, and out of heat.
- Brush off mud, grit, and salt after every trip, because residue holds moisture against the materials.
- Let the boots dry fully at room temperature in a ventilated place. I would avoid direct sun, heaters, radiators, fireplaces, and hot cars.
- Remove the insoles and loosen or remove the laces so air can reach the inside.
- Lightly stuff the boots with clean paper or use a boot shaper if the upper tends to collapse.
- Store them in a dry, cool, ventilated space. A breathable box or open shelf is better than a sealed plastic bin if there is any chance of residual moisture.
- If your climate is humid, add silica gel packs, but treat them as backup protection, not a cure for wet boots.
The biggest mistake I see is people storing boots before the inside is actually dry. That is where odor, mildew, and extra material stress begin, and it is especially bad in humid parts of the country. Once storage is under control, the construction of the boot becomes the next factor that decides how long it can survive.
Which boot constructions age better over time
Not all hiking footwear ages the same way. Some designs are built to absorb a lot of trail abuse, while others are built more for lightness and cost. If you are buying for longevity, the construction matters as much as the brand name.
| Construction | Long-term behavior | Best fit for | Main tradeoff |
|---|---|---|---|
| PU midsole boot | Excellent support and cushioning, but more vulnerable to hydrolysis in storage | Hikers who want stability and a more structured ride | Can age out even with low mileage |
| EVA midsole boot | Lighter and often less prone to hydrolysis, but cushioning can pack out sooner | Day hikers and lighter loads | May lose rebound faster under heavy use |
| Cemented construction | Light and common, but usually harder to repair once the bond fails | Buyers who prioritize price and low weight | Limited repair life |
| Welted or stitched construction | Usually more repair-friendly and better for long ownership | Hikers who want a boot worth resoling | Heavier and more expensive up front |
If I had to summarize the buying side in one line, I would say this: choose the boot that can be repaired before you need it repaired. In the U.S., a basic resole often lands around $80-$150, while rand work, full rebuilds, or specialty mounts can cost more. That makes a big difference when the upper is still healthy but the sole unit has reached the end of its life. The last question is when that repair makes sense and when it does not.
When repair makes sense and when replacement is smarter
A repair is usually worth it when the upper is solid, the stitching is intact, and the outsole or midsole is the only problem. That is the situation where a cobbler can give you a meaningful second life without forcing you to break in a brand-new boot.
- Choose repair if the outsole is worn but the upper still supports your foot well.
- Choose repair if the boot has a stitched or otherwise resoleable construction.
- Choose replacement if the PU has turned crumbly through the whole midsole, not just at the edge.
- Choose replacement if the upper is cracked, the lining is failing, and the sole is failing too.
For hiking footwear, I do not think the decision should be sentimental alone. A boot that has one fixable problem is a good repair candidate; a boot that has multiple age failures is usually a bad investment. That is the point where the material science stops being abstract and starts becoming a practical budget decision.
The few checks I would do before putting trail boots back on a shelf
If I were setting a pair aside after a season on the trail, I would do four things every time: clean them, dry them fully, loosen the structure, and store them somewhere cool and ventilated. Those four steps will not stop hydrolysis forever, but they do reduce avoidable damage and make it much easier to spot trouble early.
The deeper lesson is that unused footwear is not paused footwear. Foam, glue, leather, and rubber keep aging, and hiking boots are built from enough different materials that one weak link can end the whole pair. If you inspect them once in a while and treat storage as part of the care routine, you give yourself a much better chance of catching failure before it shows up halfway down a mountain.