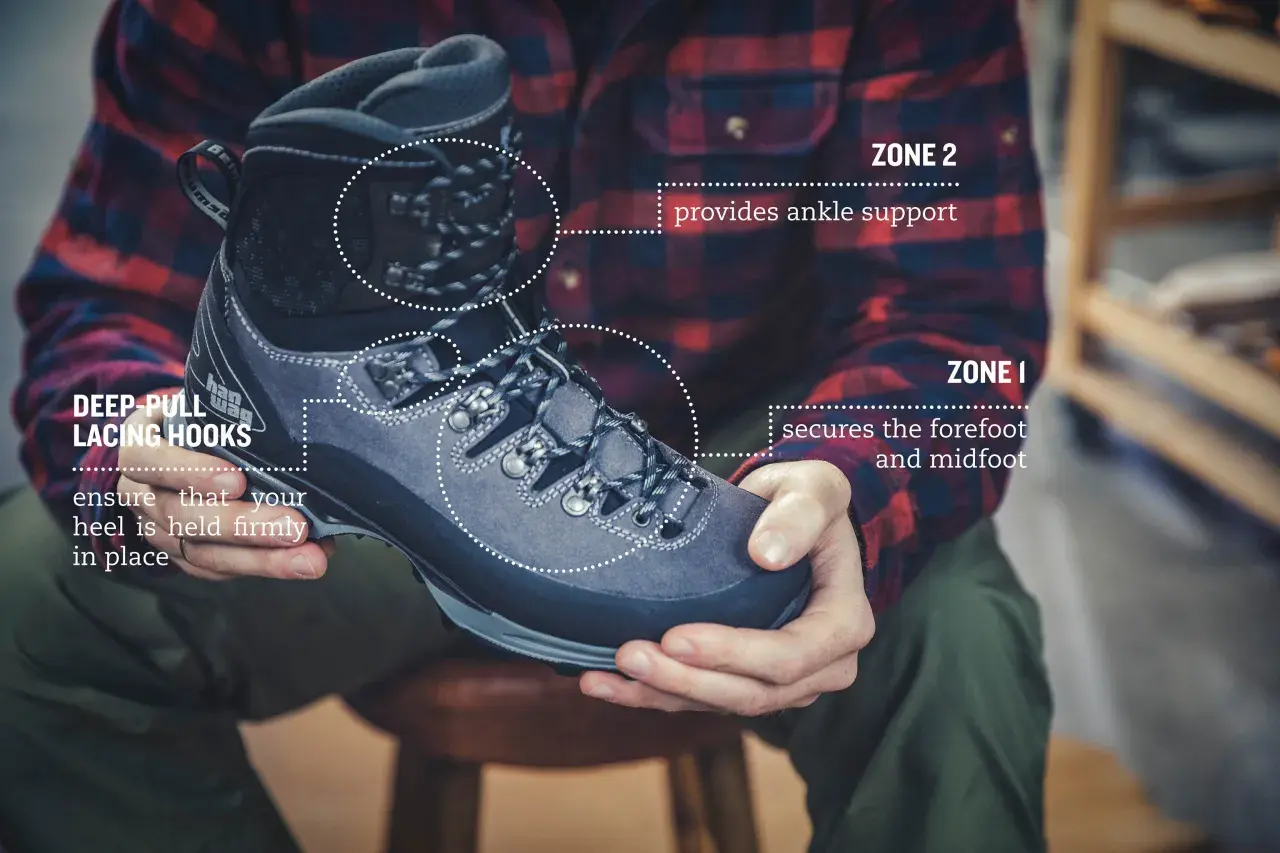
What matters most on the way down
- Lock the heel at the instep. That is the biggest change when you move from flat hiking to descending.
- Keep the forefoot snug, not crushed. Too much pressure across the toes can make sliding worse, not better.
- Use a surgeon’s knot or heel lock above the bend point. That keeps tension where the boot flexes.
- Retie before a long descent. Laces settle quickly once you start walking.
- Fix fit first. Lacing can improve a good boot, but it cannot rescue the wrong size or shape.
Why downhill lacing feels different
On an ascent, your feet usually settle more evenly into the boot. On a descent, gravity changes the job. Every braking step pushes the foot forward, and every bit of slack lets the heel lift and the toes hit the front. That is why a lacing pattern that feels fine on a forest trail can feel sloppy on a steep scree pitch or a long stone staircase in the mountains.
I think of it as load management. The boot should hold the foot back where it bends, while still allowing the ankle to move naturally. If you tighten the entire boot evenly from toe to cuff, you often create new problems: numb toes, pressure on the top of the foot, or a cuff that fights your stride. The better approach is to tighten the right zones and leave the others alone. That leads straight into the one pattern that does most of the work.
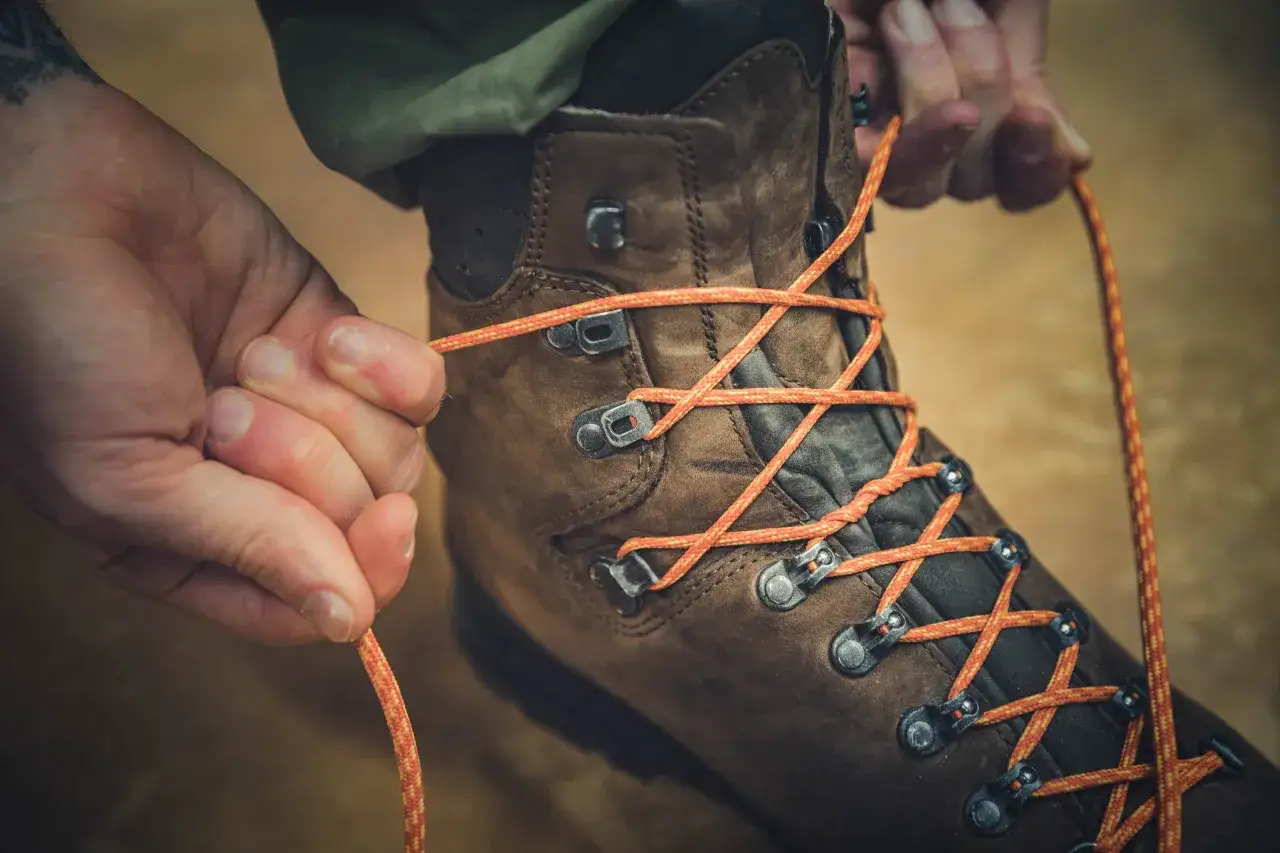
The heel-lock pattern I trust on steep descents
- Lace the boot normally until you reach the point where your foot begins to flex hard, usually around the instep.
- Pull the laces snug so the heel settles fully into the heel cup before you lock anything.
- Make a surgeon’s knot by wrapping the laces around each other twice, then pulling them tight.
- Run each lace up to the next hook or eyelet and repeat the lock if the boot has enough height for it.
- Finish with a firm bow, then secure the loops so they do not loosen on brush, rock, or wet leather.
The goal is simple: hold the foot back where the boot bends. That is what reduces forward slide. You do not need to strangle the cuff to get that effect, and you definitely do not need to crank the toe box shut. If the boot has speed hooks, use them to preserve the tension you already created; if not, one strong lock at the instep usually matters more than brute force at the top.
Once the heel stops drifting, the rest of the fit becomes easier to judge. That is where fine-tuning comes in.
How to fine-tune tension zone by zone
The mistake I see most often is treating the boot like a single strap. It is not. Different zones need different tension, especially on steep ground. Here is the quick version I use when I want a boot to descend cleanly without cutting off circulation.
| Zone | What it should feel like | What to do if it feels wrong |
|---|---|---|
| Toe box and forefoot | Snug enough to stop the foot creeping, but still roomy enough for toe wiggle. | Ease off the lowest crossings slightly. If your toes curl, the boot is too tight in front. |
| Instep | The firmest point in the lacing, because this is where the heel gets anchored. | Add tension here first and lock it with a surgeon’s knot. |
| Ankle and cuff | Supportive, but not so tight that your ankle cannot flex on braking steps. | Loosen the upper hooks one notch if the cuff bites into the front of the ankle. |
| Knot and lace ends | Secure and stable after a few steps. | Use a double knot or lace keeper if the bow slips on its own. |
If the top of the foot feels crushed, I switch to window lacing over the pressure point instead of loosening the whole boot. That creates a small gap in the tension pattern and often solves the problem without giving up heel security. Toe-relief lacing is useful when a boot is pressing the front of the foot, but on a downhill section it is usually a stopgap, not the main solution. For descents, the real priority is keeping the foot from sliding forward in the first place.
Once tension is sorted by zone, the next problem is avoiding the mistakes that quietly undo all of it.
Common mistakes that make descents worse
- Cinching everything equally. This often traps the forefoot while still letting the heel move.
- Ignoring the instep. If the lace lock sits too high or too low, the heel can still drift.
- Overtightening the toes. Numb toes do not control the boot better; they just hurt faster.
- Failing to retie after the boot settles. After 10 to 15 minutes of walking, many boots relax a little and need a quick reset.
- Using lacing to compensate for poor fit. If the boot is too long, too wide, or shaped wrong for your foot, no pattern will fully fix it.
- Confusing comfort with stability. A boot can feel soft on level ground and still be unstable on a long descent.
I also see people blame the lacing when the laces themselves are the weak link. Slick, worn, or overly round laces can slip no matter how careful you are. If your knot keeps loosening, replacing the laces can be a cheaper fix than buying new boots. On wet European rock or loose alpine rubble, that small upgrade can matter more than people expect.
Before you trust the setup on a big mountain day, it is worth checking the fit under real downhill pressure.
A quick fit test before a long descent
I like to test a downhill setup before I am committed to a full day of steep trail. It takes a minute, and it tells you more than standing still ever will.
- Lace the boots on level ground, then walk to a small slope, staircase, or curb line.
- Bend your knees slightly and take 10 controlled braking steps.
- Watch the heel: if it lifts and drops with every step, tighten the instep lock first.
- Watch the toes: if they hit the front, you need less forward movement, not a tighter toe box.
- After 5 to 10 minutes, stop and retension once the boot has settled.
If you still get toe bang after that, the answer is usually not another twist of the lace. It is often a fit issue: too much internal volume, the wrong sock thickness, or a boot shape that does not match your foot. In my experience, lacing can refine a good boot, but it cannot redeem a bad one. That distinction matters a lot on long descents where every step compounds the problem.
The setup I would trust on a long mountain descent
For a steep walk down, especially on stone, scree, or long alpine switchbacks, I would start with a snug forefoot, a locked instep, and a cuff that supports without blocking movement. That combination keeps the heel planted and gives the toes a little breathing room so they are not slamming the front of the boot all afternoon. It is a simple setup, but it is the one that tends to hold up when the trail gets serious.
My rule is straightforward: retie before the descent, not after the pain starts. If the boot feels secure but not crushed, and the heel stays quiet when you brake into each step, you have the right pattern. On demanding trails, that is the difference between managing the hill and fighting your footwear all the way down.