
The fastest way to get a secure fit from hook-style hiking boots
- Start with an even criss-cross lace pattern and keep the tongue centered before you reach the hooks.
- Use the hook section to control fit, not just to finish the boot.
- A surgeon’s knot or heel-lock pattern is the quickest fix for heel slip on uneven terrain.
- Window lacing helps when the top of the foot feels pinched, while skipping the first hook can ease toe pressure.
- If you keep needing extreme tension, the real issue is probably boot size, width, or volume.
What hooks change in a hiking boot fit
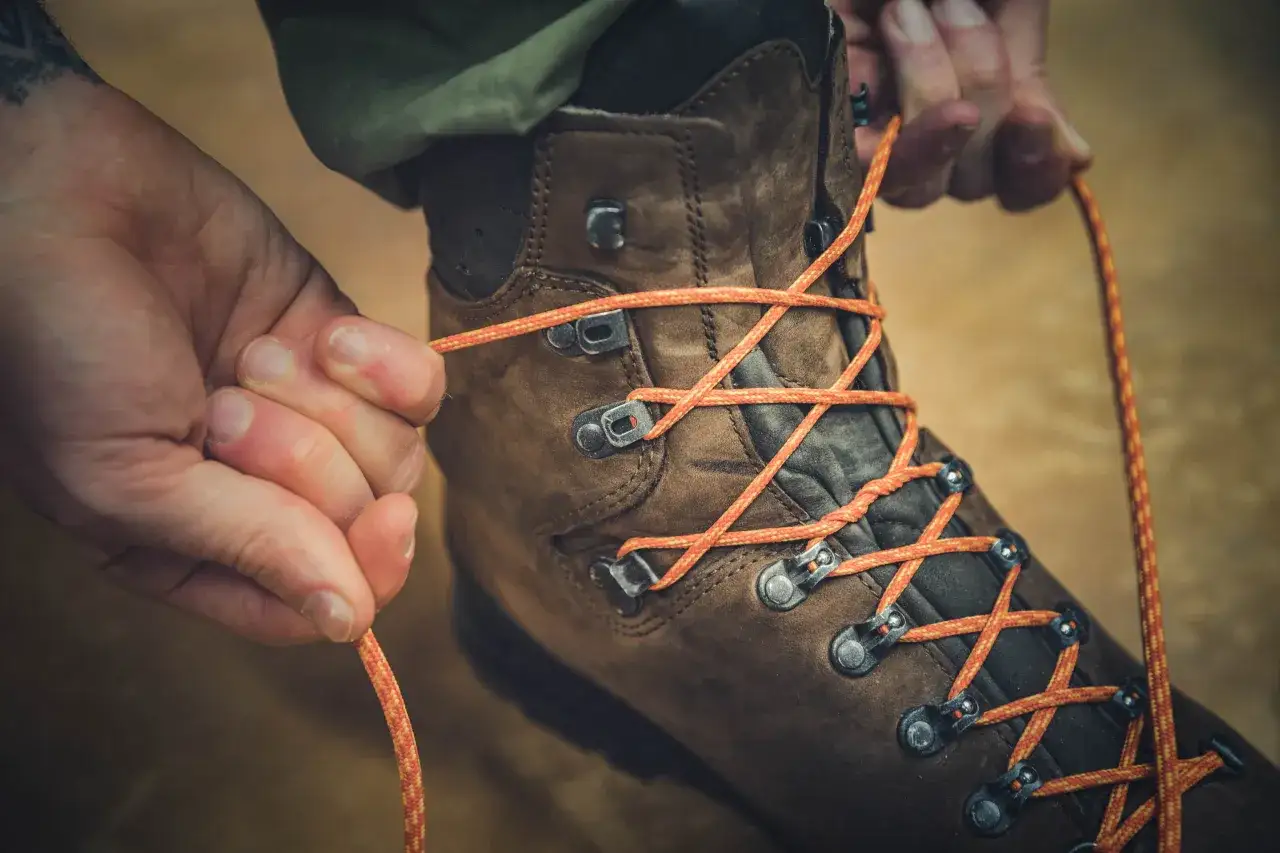
Hooks, also called speed hooks or quick-lace hooks, are the open metal pieces near the top of many hiking boots. They let you change tension quickly, which is useful on the trail when your feet swell, your socks settle, or the terrain changes. They also make fit problems easier to feel: if tension is uneven, the boot will usually tell you right away through heel slip, a pinched instep, or a tongue that drifts to one side.
The hook zone should change tension, not create it from scratch. I like to think of the lower eyelets as the part that seats the foot, and the hooks as the part that fine-tunes the hold. If you try to use the hooks to solve a boot that is fundamentally too loose or too narrow, you usually end up with one area too tight and another area still moving.
That is why the first step is never a fancy knot. It is getting the base lacing right so the hook section has something useful to work with. Once that foundation is stable, the patterns below become much more effective.
The base lacing pattern I start with every time
For most hiking boots, I start with a plain criss-cross pattern up through the lower eyelets, then use the hooks only once the boot reaches the flex point of the foot. That keeps the fit even across the forefoot and makes the upper section easier to tune.
- Seat your heel fully back in the boot before you tighten anything.
- Lace the lower eyelets evenly, alternating sides so the tension stays balanced.
- Snug the boot over the instep, but do not crank it down so hard that the top of the foot feels compressed.
- When you reach the hooks, run the lace straight up to the next hook pair instead of crossing immediately if you need a firmer hold.
- Keep the tongue centered while you tighten so the pressure does not stack on one side.
- Finish with a bow or locking knot that matches the amount of tension you need.
This is the baseline I use before I decide whether I need a heel lock, a pressure-relief window, or just a cleaner finish. It is also the easiest pattern to retension on trail without starting over from the toe box.
Lock the heel before you tighten the ankle
When a boot slips at the heel, I do not respond by tightening the top hooks harder. I first lock the instep and the flex point, because that is where most of the unwanted movement starts. REI’s boot-lacing guide recommends using a surgeon’s knot around the hook pair closest to the flex point, then continuing upward once the lower tension is set.
Use a surgeon’s knot for a fast lock
A surgeon’s knot is basically a double wrap before you pull the laces tight. It adds friction, so the tension is less likely to slide loose while you hike. I use it when the boot feels fine everywhere except for a little movement over the top of the foot or at the heel.
- Tighten the boot normally up to the hook pair just below the flex point.
- Wrap the laces around each other twice, not once.
- Pull firmly so the knot seats before you continue.
- Repeat once more one hook pair higher if the boot still shifts.
Use a heel lock when you want maximum hold
The heel-lock pattern is the better option when descents are punishing your toes or your heel keeps lifting no matter how carefully you lace. You lace up to the hook area, run each side straight up, then cross and tension the laces against each other so the boot grabs the back of the foot more securely. It is a small change, but on steep ground it can make the difference between a stable stride and a boot that slides forward every few steps.| Problem | Best fix | Why it works |
|---|---|---|
| Heel slip | Surgeon’s knot + heel lock | Holds tension around the flex point instead of letting the foot drift forward |
| Top-of-foot pressure | Window lacing | Creates a small relief zone over the instep |
| Toe crowding on descents | Skip the first hook | Gives the toe box a little more room without making the whole boot sloppy |
Once you know which problem you are solving, the hook section stops being decorative hardware and starts acting like a real fit tool. That also makes it easier to decide when you should relieve pressure instead of increasing it.
Ease pressure without losing control
Some fit problems do not need more tension. They need less pressure in one specific spot. That is where window lacing and toe-relief lacing earn their keep. They let you preserve overall stability while opening up a painful area just enough to keep walking comfortably.Use window lacing when the instep feels pinched
Window lacing, sometimes called box lacing, creates a small gap over the painful area on top of the foot. You unlace down to the hooks just below the pressure point, go straight up to the next hook, then cross again above the sensitive spot. It is one of the cleanest fixes for a boot that feels okay everywhere except the top of the foot.
I reach for this when the tongue feels like it is pressing too hard into the instep, especially on older boots or on days when swelling makes the fit feel tighter than usual. If the pain sits in the same exact place on every hike, though, I treat that as a boot-shape issue, not just a lacing issue.
Read Also: Hiking Boot Care - Extend Their Life & Comfort
Skip the first hook when your toes need space
Toe-relief lacing is the simplest emergency adjustment. You completely unlance the boot and then lace it back up while skipping the first hook pair near the toe box. That opens a little extra room at the front of the boot, which can help on long descents when your feet slide forward or swell during the day.
It is not a permanent cure for chronic toe pain, but it is useful when you need to finish a hike without blunting every step. If you still feel your toes hitting the front after that adjustment, the boot is probably too short, too narrow, or both.
For long days in the mountains, I usually think in this order: heel first, instep second, toes last. That keeps the boot secure where it matters most while still respecting the part of the foot that is most likely to swell as the day goes on.
Finish with a knot that stays put on the trail
A clean bow matters more than people think. A sloppy finishing knot can undo all the good work you did lower on the boot, especially if the laces are slick, waxed, or a little worn. I prefer a square knot or a double bow because they are more stable than a loose granny knot and still easy to release at the end of the day.
If the loops lie neatly across the boot, the knot is usually more secure. If they twist front-to-back, I retie it. That small habit saves me from having to stop and fix the boot again ten minutes later on a climb.
For replacement laces, a practical baseline helps. Danner’s sizing guide, for example, uses 63-inch laces for many 5- to 6-inch boots and 72-inch laces for many 8-inch boots, with longer boots often needing 84-inch laces. That is not a universal rule, but it is a good reminder that hook-style boots often need more lace than people expect, especially if you add locking knots or skip eyelets for pressure relief.
| Boot setup | Typical lace length baseline | What changes the number |
|---|---|---|
| Low hiking boot with fewer eyelets | Usually shorter than 63 inches | Whether you use hooks, skip eyelets, or double-knot |
| Mid-height hiking boot | About 63 to 72 inches | Extra lace needed for surgeon’s knots and heel locks |
| Tall hiking or backpacking boot | About 84 inches or more | More eyelets, more hook pairs, and more room for tension changes |
If your laces are just barely long enough, I would replace them before a big trip. Hooks make adjustment easier, but only if you have enough lace left to lock the fit properly.
Common mistakes that make hook lacing fail
The mistakes I see most often are not dramatic. They are small errors that add up to a bad fit over a few miles.
- Pulling every section as tight as possible before standing up and testing the fit.
- Using the hooks to force a boot that is too wide or too narrow for your foot.
- Leaving the tongue off-center, which creates pressure points and uneven hold.
- Ignoring worn laces, especially if they have gone slick or started to flatten in the wrong places.
- Tightening the ankle to solve heel slip when the real problem is movement over the instep.
- Tying the knot above the pressure point you were trying to relieve in the first place.
If the boot feels wrong before you reach the hooks, lacing will not fully fix it. That is the line I use in my own head when I am trying to decide whether to adjust again or stop and reassess. A good lacing pattern should refine fit, not fight the shape of the boot.
Once you start avoiding these mistakes, the lacing system becomes much more predictable. That is usually the point where you can tell whether the boot itself is worth keeping.
When the problem is fit, not technique
There is a point where more lacing tricks stop helping. If your heel still lifts after a heel lock, if your toes still slam the front on descents, or if the same spot on your instep goes numb every time, the boot is probably the wrong size or volume for your foot. At that stage, I look at width, length, insole shape, and even sock thickness before I try another knot.
That is especially true on hikes with long climbs and equally long descents, where feet change shape during the day. A boot can feel perfect in the shop and still become unreliable once your feet swell and the trail starts loading the forefoot differently. The lacing fixes above are useful, but they are not a substitute for a boot that matches your foot from the start.
My rule is simple: if a boot only feels acceptable when it is laced to the edge of discomfort, I stop treating it as a lacing problem. The right answer is usually a better fit, a different lace length, or a boot model with a shape that works with your foot instead of against it.